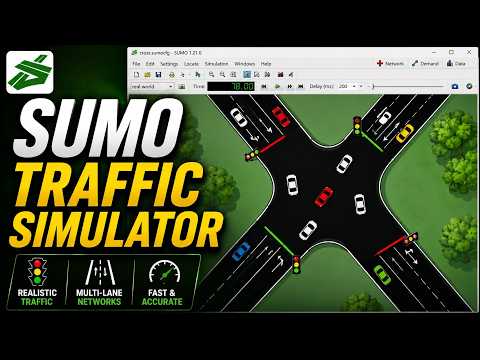
Install SUMO and build your first traffic simulation.
A practical Windows walkthrough for installing Eclipse SUMO, setting up PATH and SUMO_HOME, learning SUMO-GUI and NetEdit, and creating a simple road network with traffic demand.
Course context: Developed for Smart Cities and Communities (SMRTTECH 4SC3) at McMaster University, Canada.
This guide is designed for a first-time SUMO user. Keep the default SUMO installation location unless you have a reason to change it, because the environment-variable examples below use the standard Eclipse SUMO folder structure.
You needWindows, administrator access if required, and a web browser.
You will usesumo-gui, netedit, and the SUMO configuration files created by NetEdit.
Step 1
Install Simulation of Urban Mobility (SUMO)
Start with the official SUMO website. If you need to reproduce an older project, you can install an archived version instead.
1
Find the SUMO installer
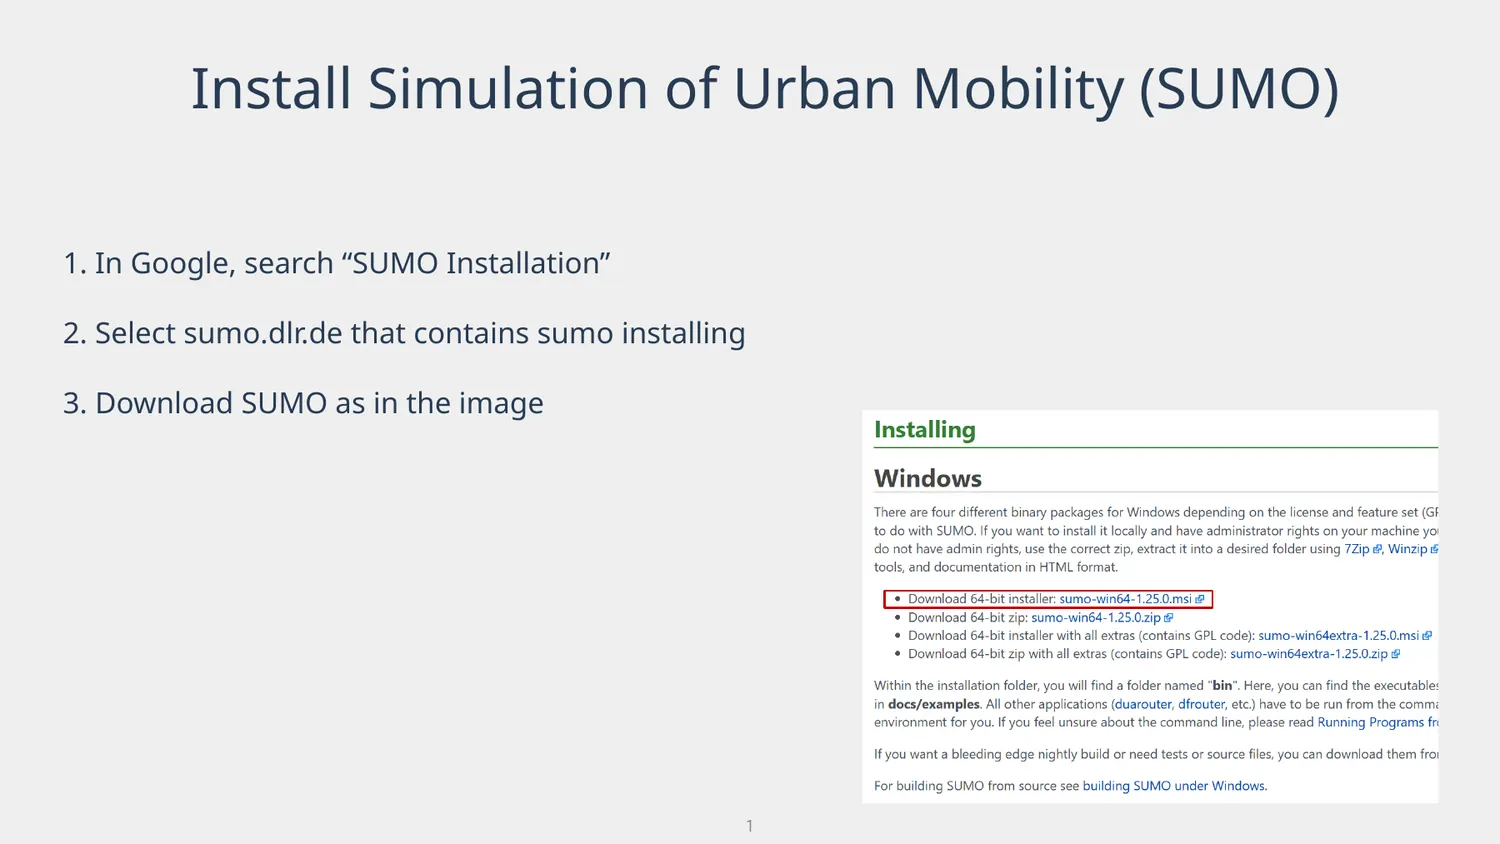
Search for “SUMO Installation” and open the official sumo.dlr.de result. Download the Windows installer shown on the official installation page.
Official SUMO download workflow from the original RoadwayVR tutorial.
2
Need an older SUMO version?
For an older project, search for the archive version you need—for example, SUMO 1.19—and use the archived download source referenced in the tutorial.
3
Keep SUMO_HOME enabled during installation
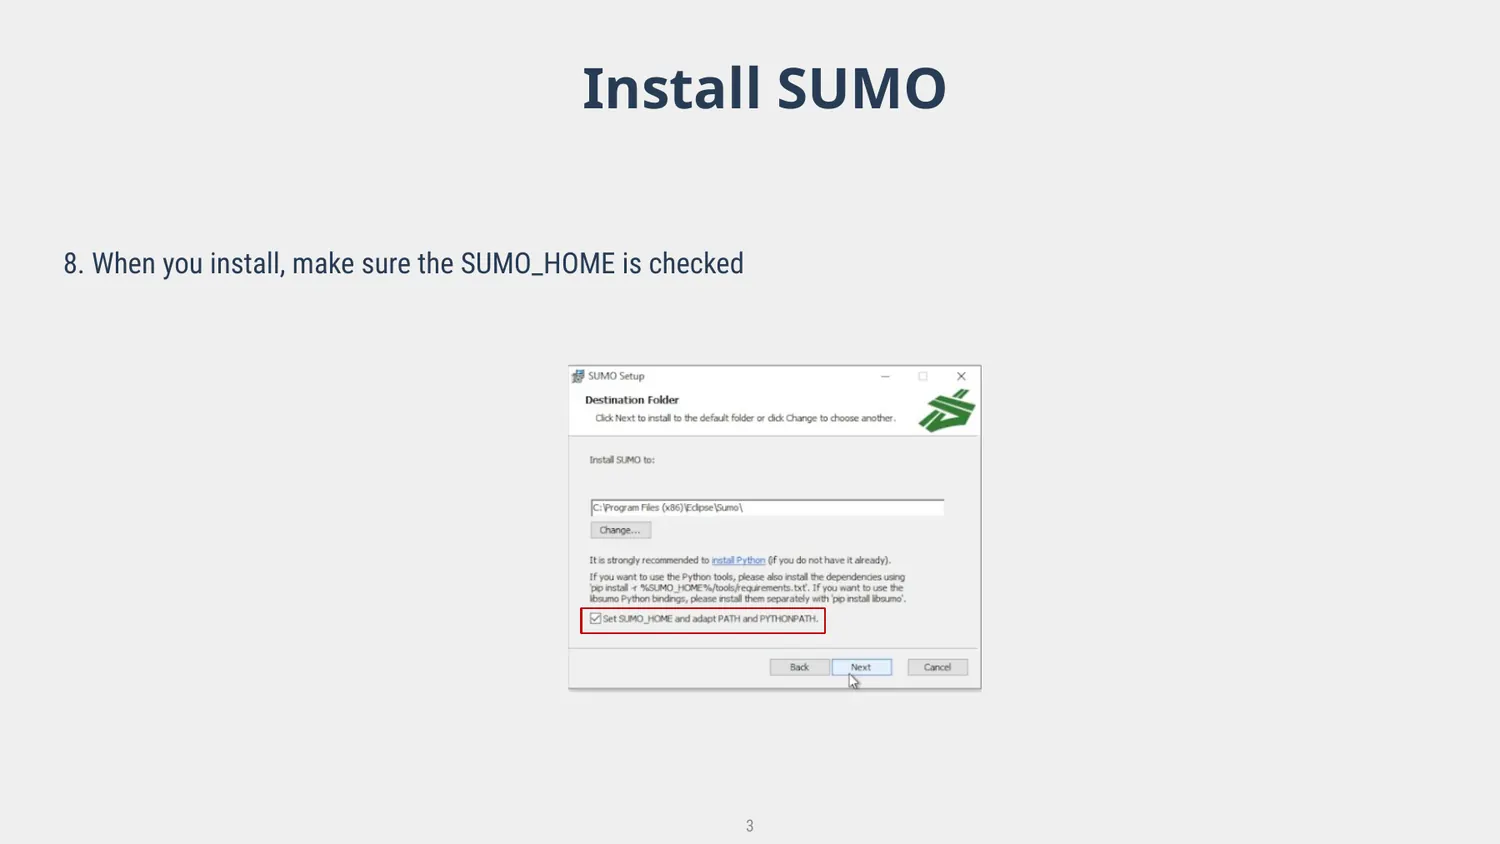
When the installer offers the option to configure SUMO_HOME, make sure it is selected. You will also verify the variable manually in the next section.
Check the SUMO_HOME option during installation.Step 2
Set up Windows environment variables
The goal is to let Windows find SUMO programs without requiring you to type the full installation directory every time.
1
Open Environment Variables
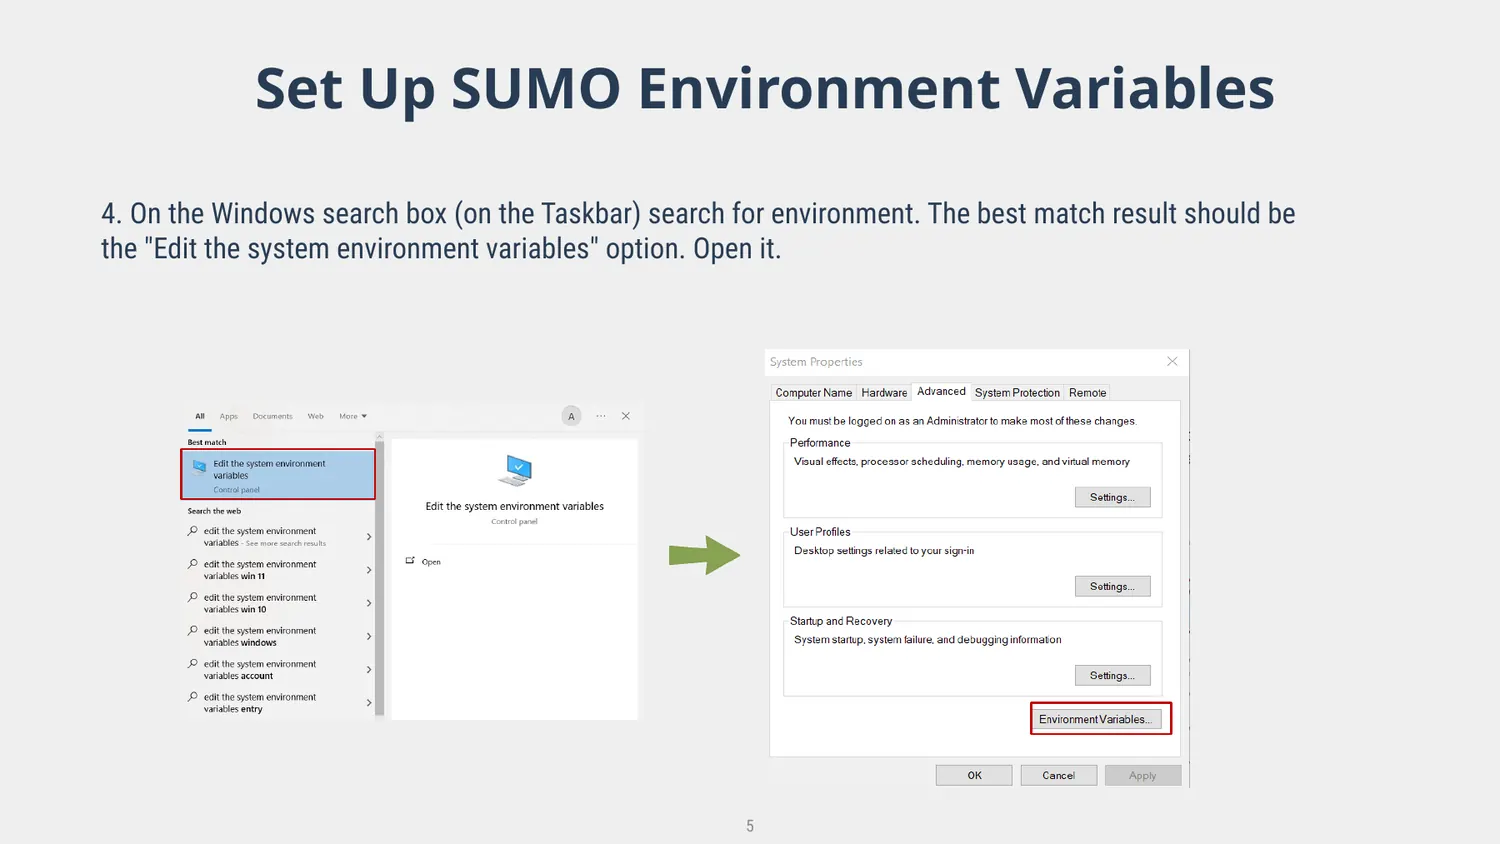
In the Windows taskbar search box, type environment. Open Edit the system environment variables, then open the Environment Variables dialog.
Open the Windows Environment Variables dialog.
2
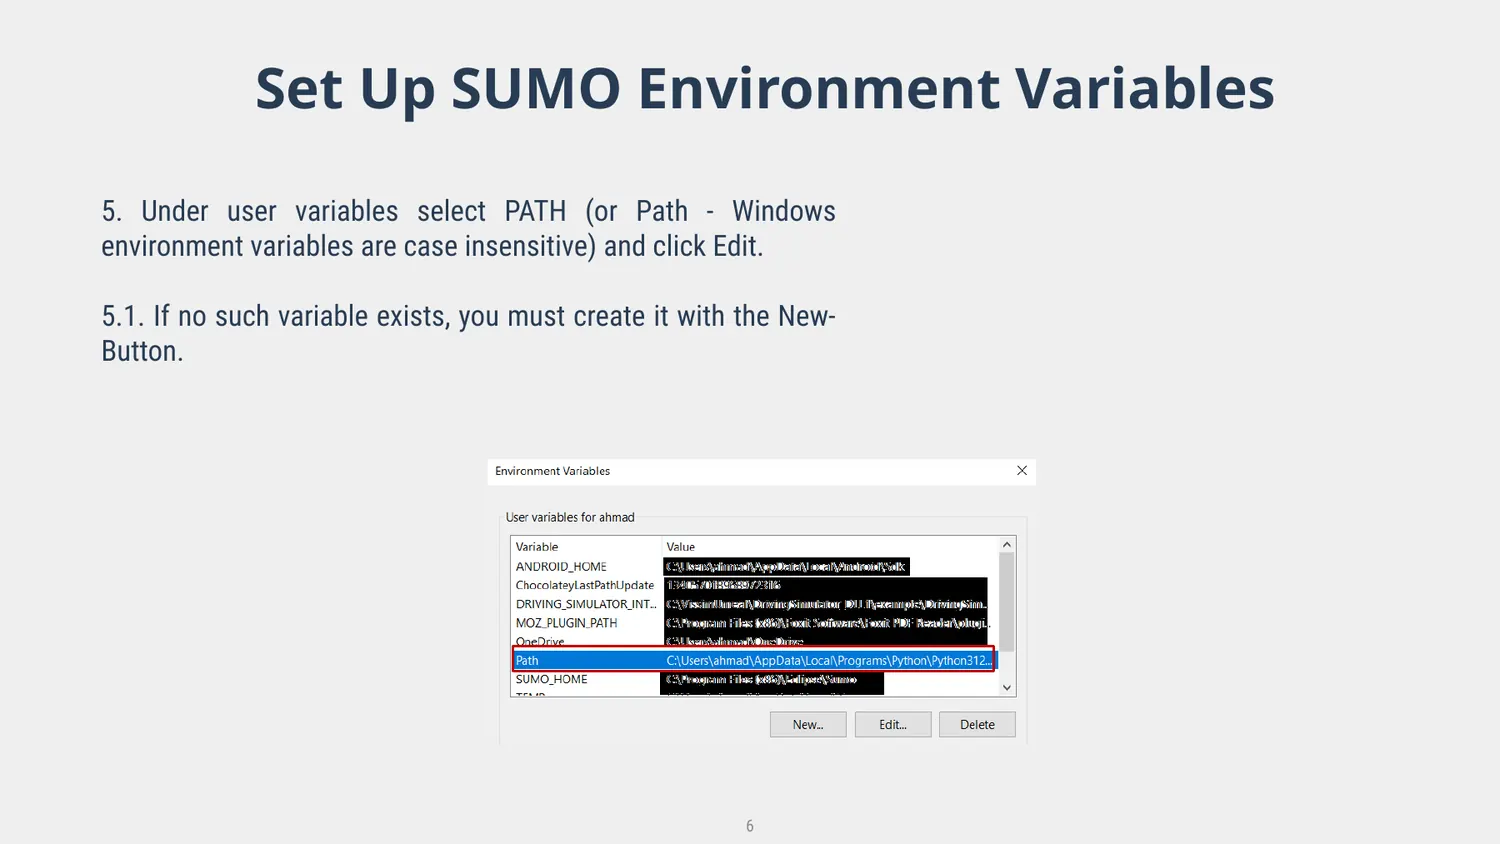
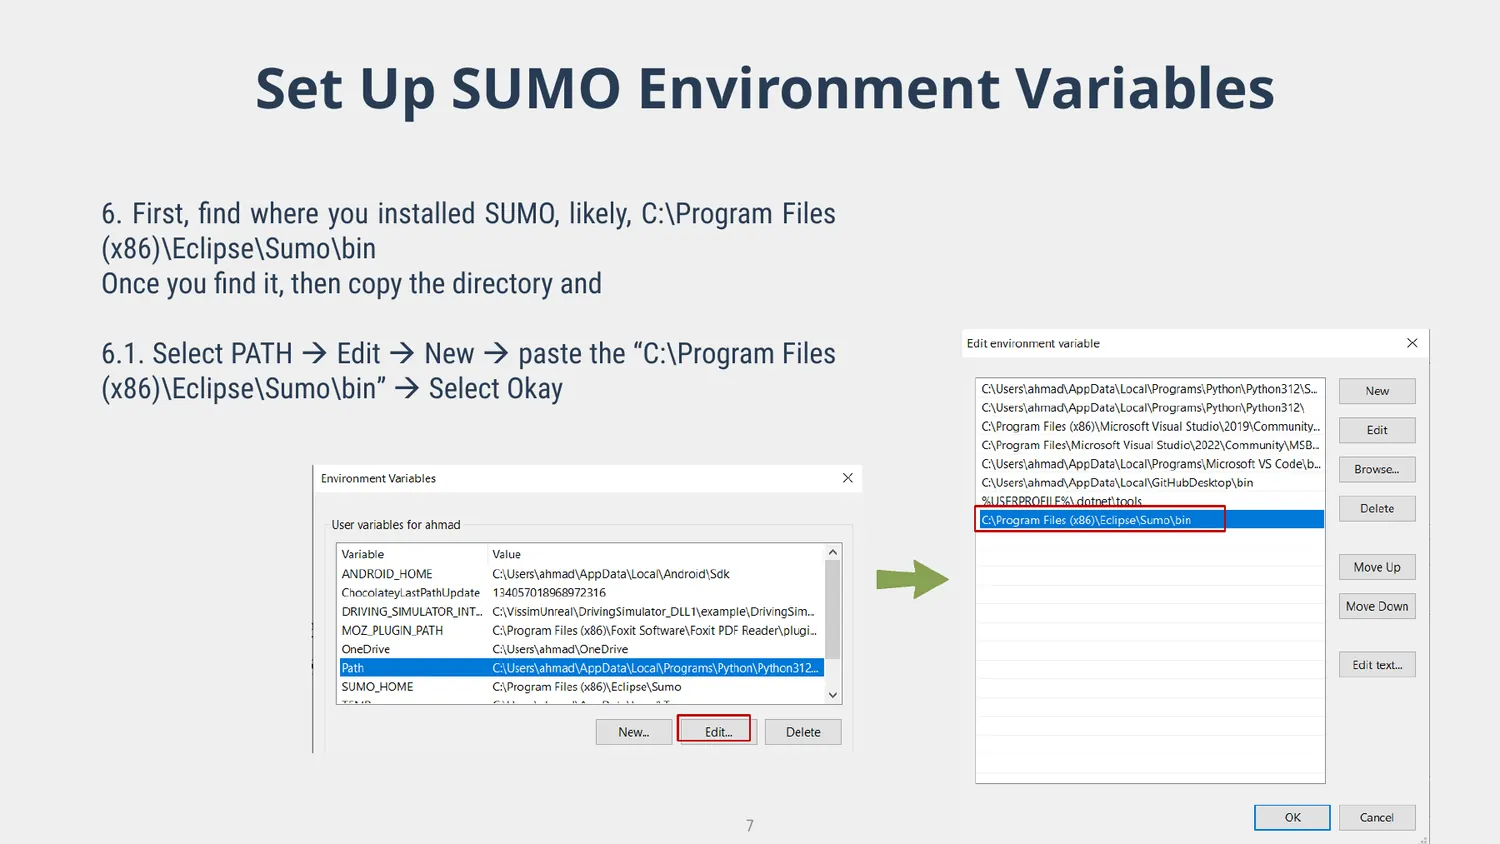
Add SUMO's bin folder to PATH
Under your user variables, select Path and choose Edit. If Path does not exist, create it. Then add the SUMO bin folder.
C:\Program Files (x86)\Eclipse\Sumo\bin
Your path may differ. Use the folder where SUMO is actually installed on your computer.
Select Path under user variables.Add the SUMO bin directory to Path.
3
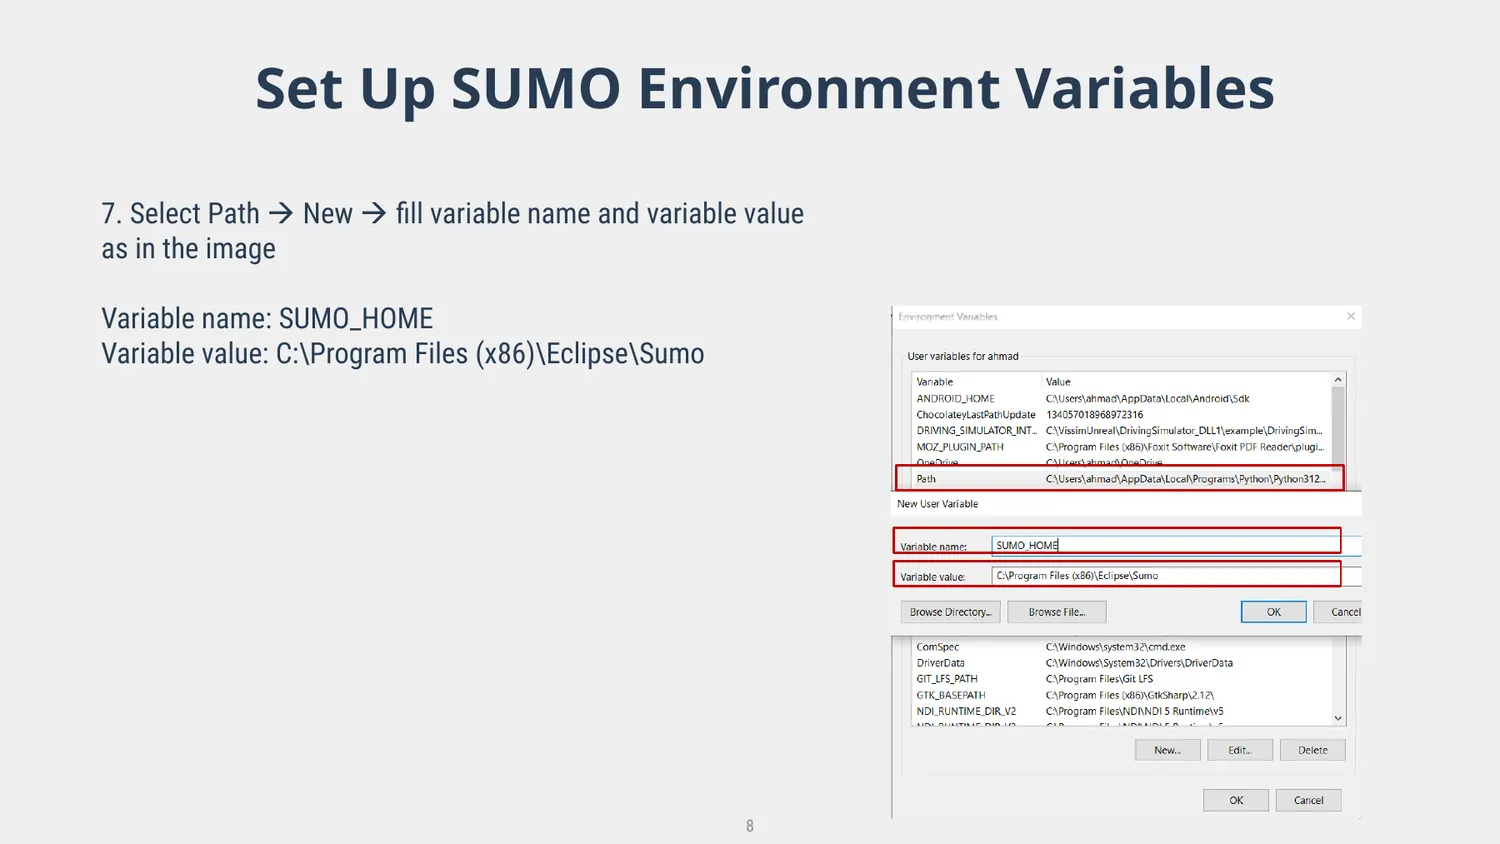
Create or verify SUMO_HOME
Create a user variable named SUMO_HOME and point it to the SUMO installation folder—not the bin subfolder.
The original RoadwayVR workflow uses Notepad++ for viewing and editing SUMO XML/configuration files. Install the current version if you want the same setup.
Step 3
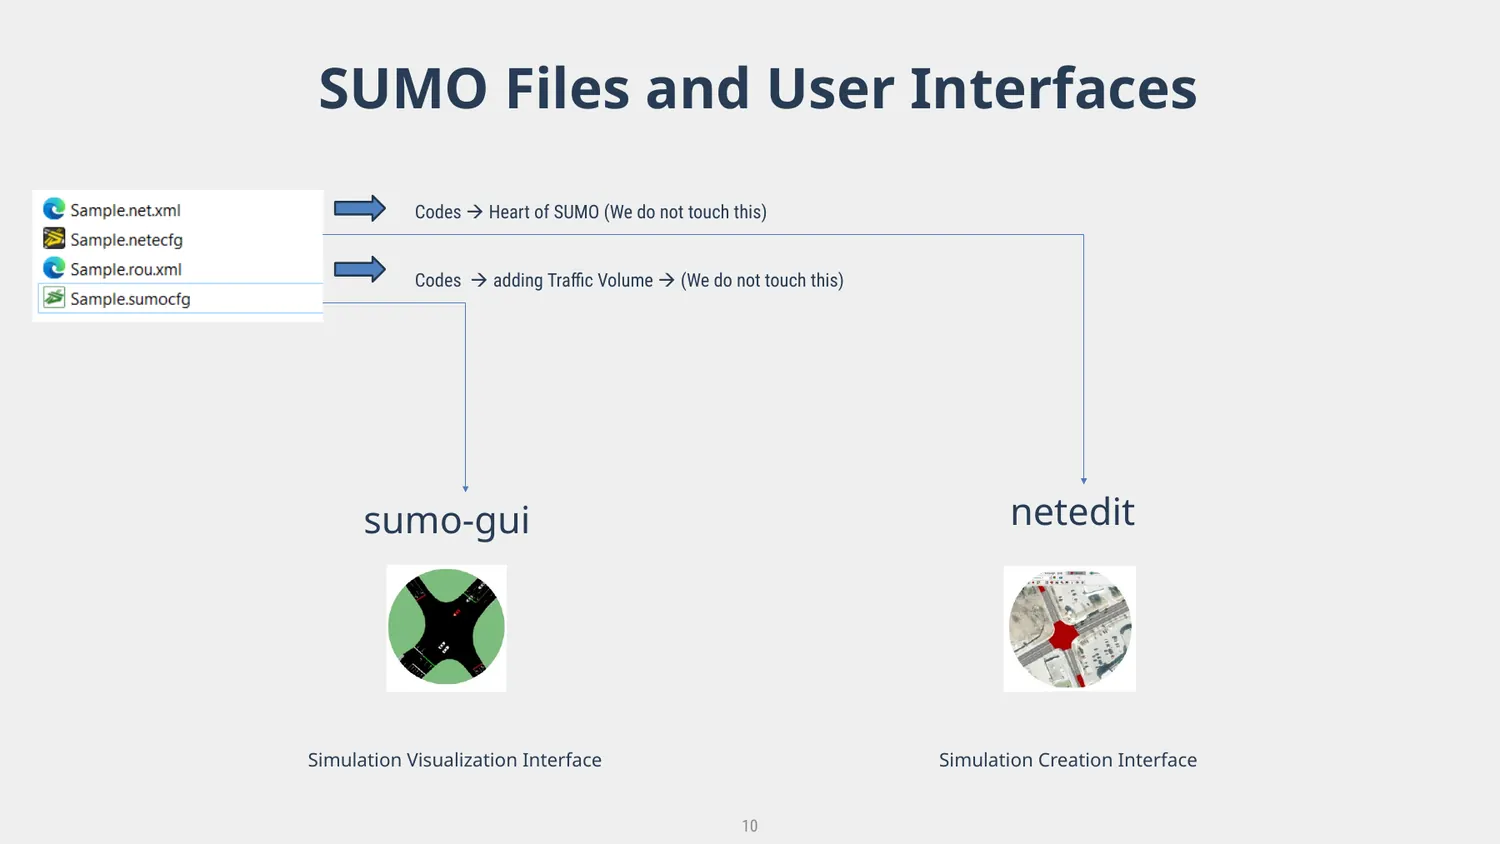
Know the two interfaces you will use most
SUMO-GUI
Use sumo-gui to visualize and run a simulation.
NetEdit
Use netedit to create and modify the road network, traffic lights, routes, vehicles, and demand.
RoadwayVR overview of the SUMO-GUI and NetEdit workflow.Step 4
Open a sample simulation
Before building from scratch, open the sample files so you can see the difference between running a simulation and editing one.
1
Download the RoadwayVR lab files
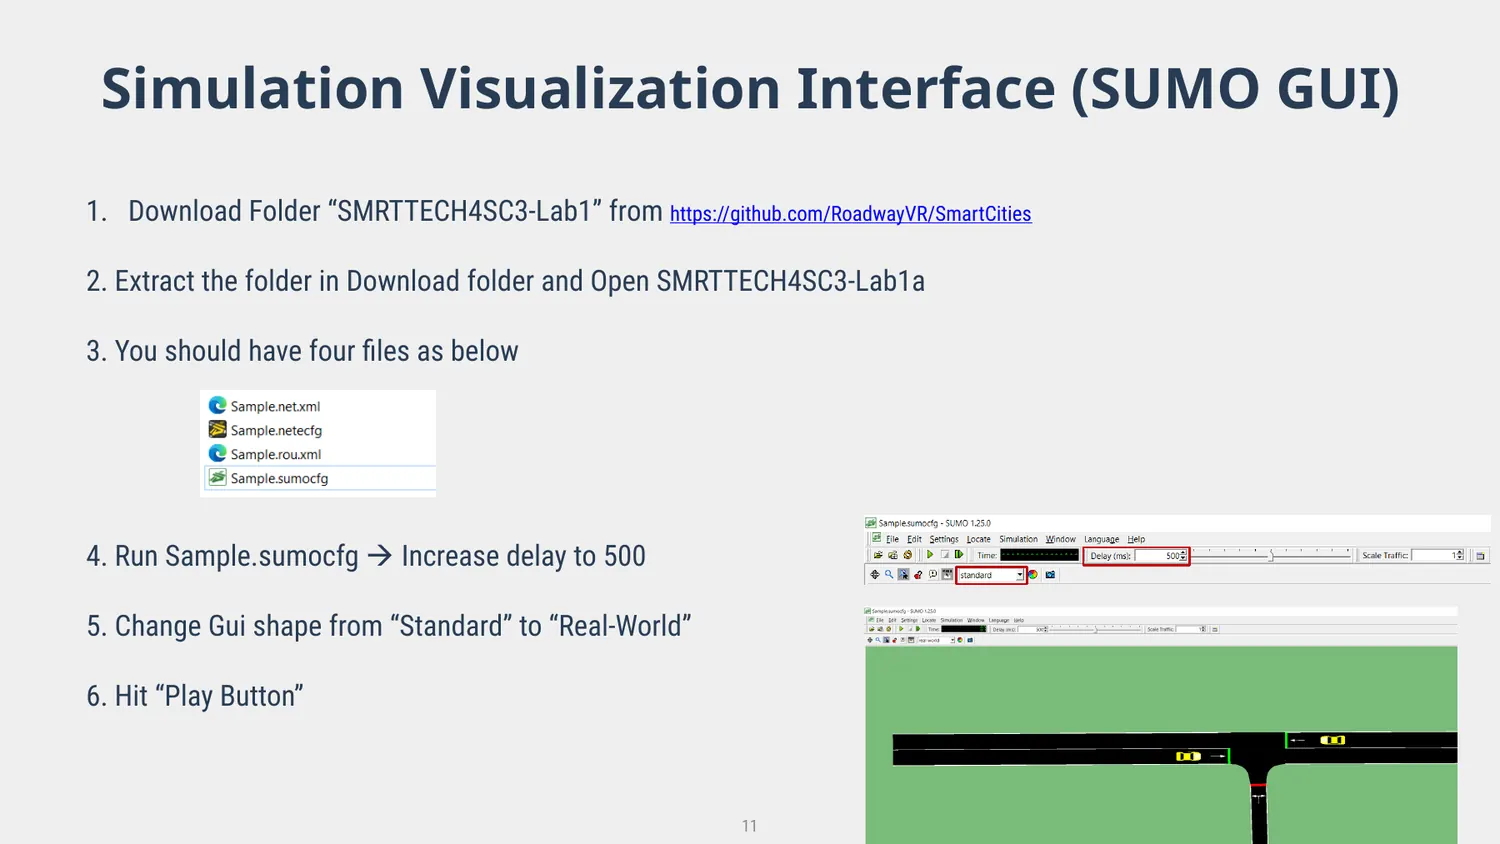
Download SMRTTECH4SC3-Lab1 from the RoadwayVR SmartCities repository, extract it, and open the sample folder.
Open Sample.sumocfg, increase the delay to approximately 500, switch the GUI shape from Standard to Real-World, and press Play.
Running the sample in SUMO-GUI.
3
Open the network in NetEdit
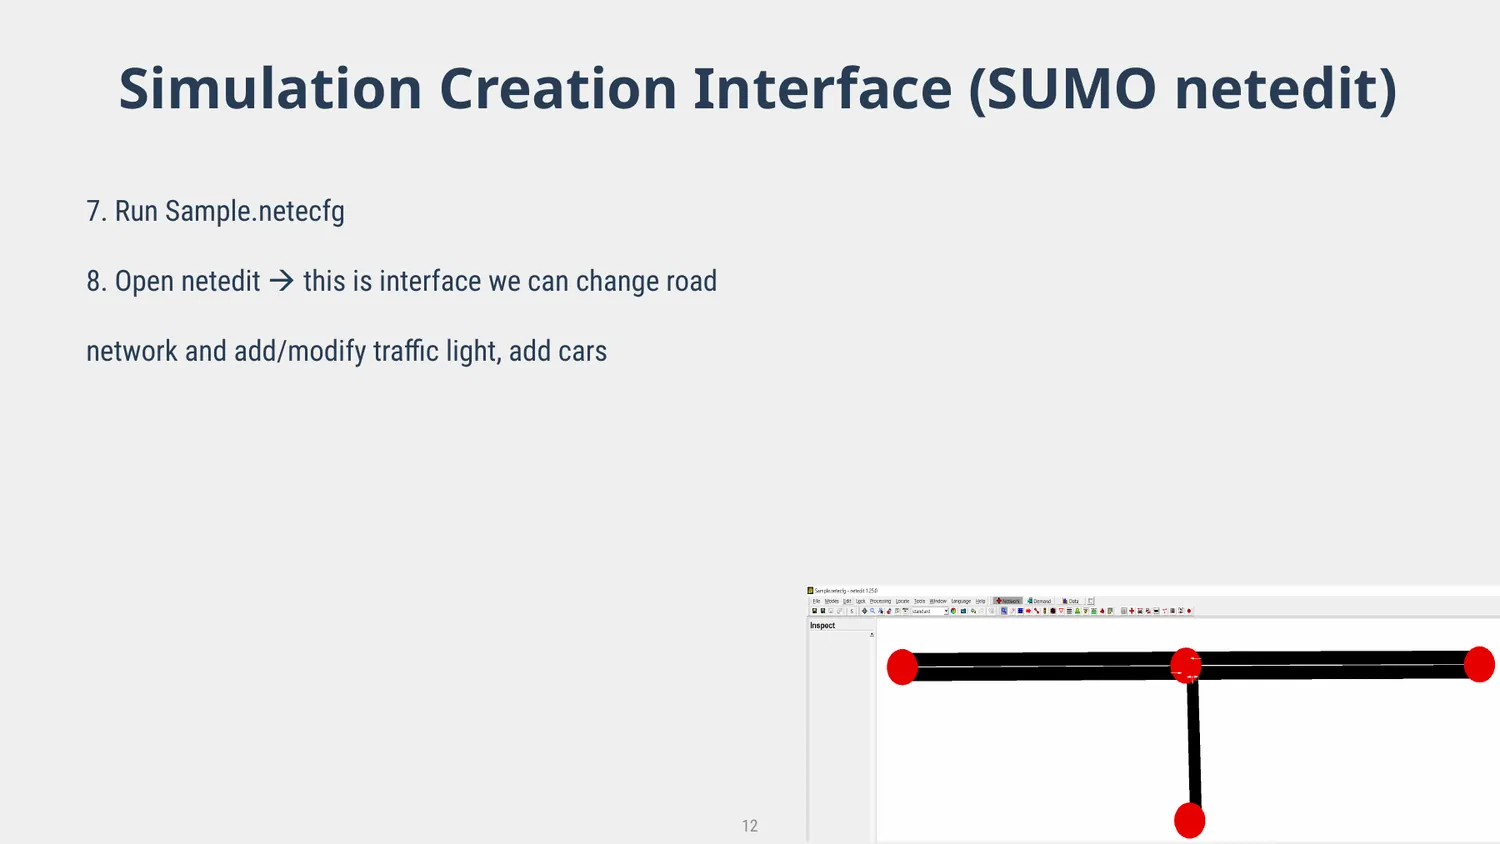
Run Sample.netecfg and open it in NetEdit. This is the interface used to change the road network, traffic lights, and vehicle demand.
The same sample network in NetEdit.Step 5
Create your first simple network
Now create a road, add traffic demand, save the generated files, and run the result in SUMO-GUI.
1
Create the network
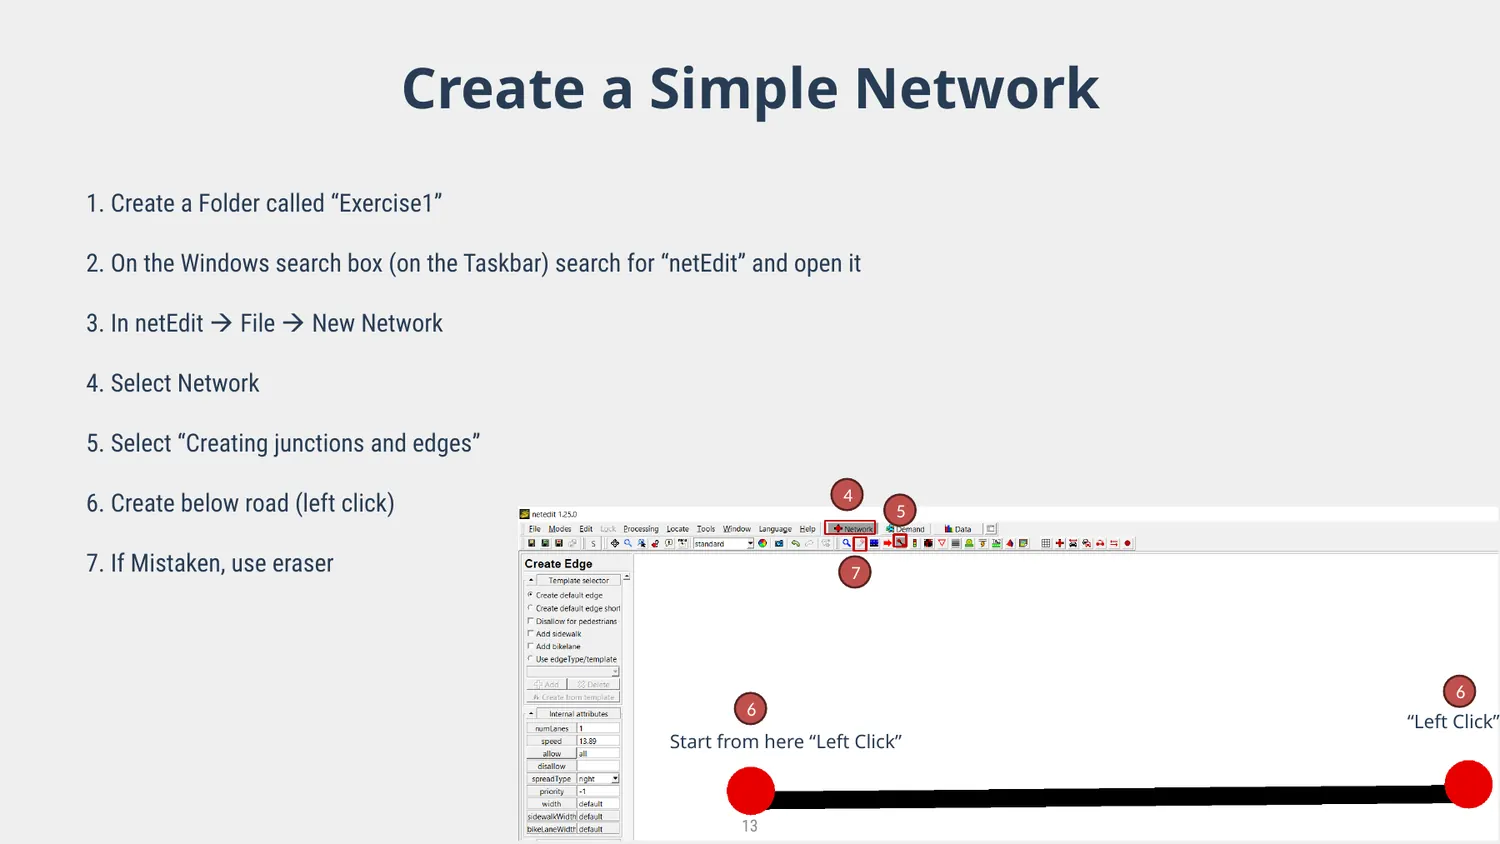
Create a folder named Exercise1. Open NetEdit → File → New Network. Select Network, choose the tool for creating junctions and edges, and draw a simple road by left-clicking the start and end points.
Create a simple edge between two junctions.
2
Add traffic demand
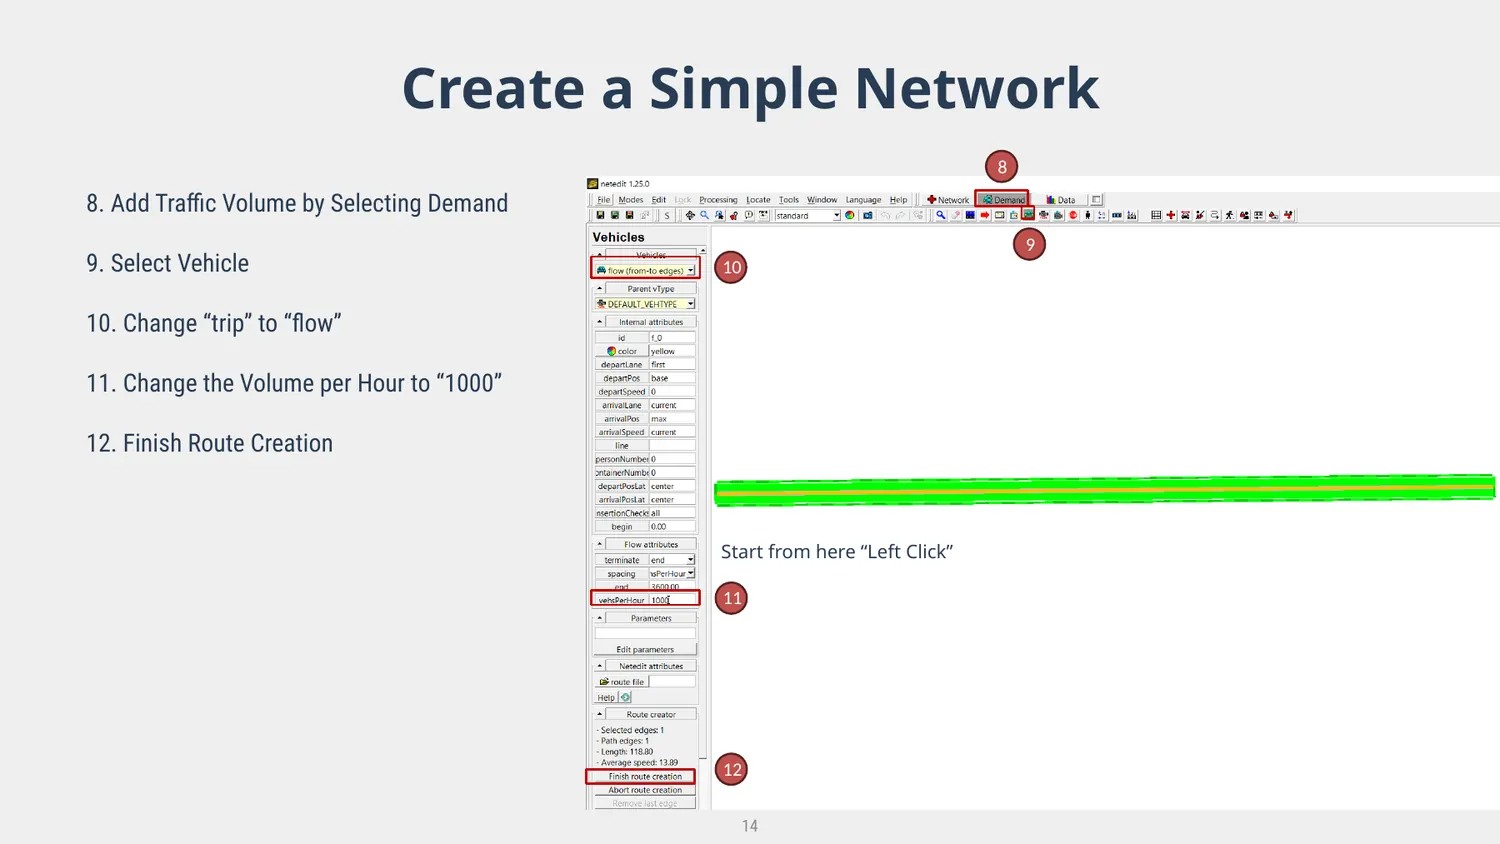
Select Demand → Vehicle. Change the demand object from trip to flow, set the volume to 1000 vehicles per hour, and finish the route creation.
Add a flow and set the hourly traffic volume.
3
Save the SUMO files
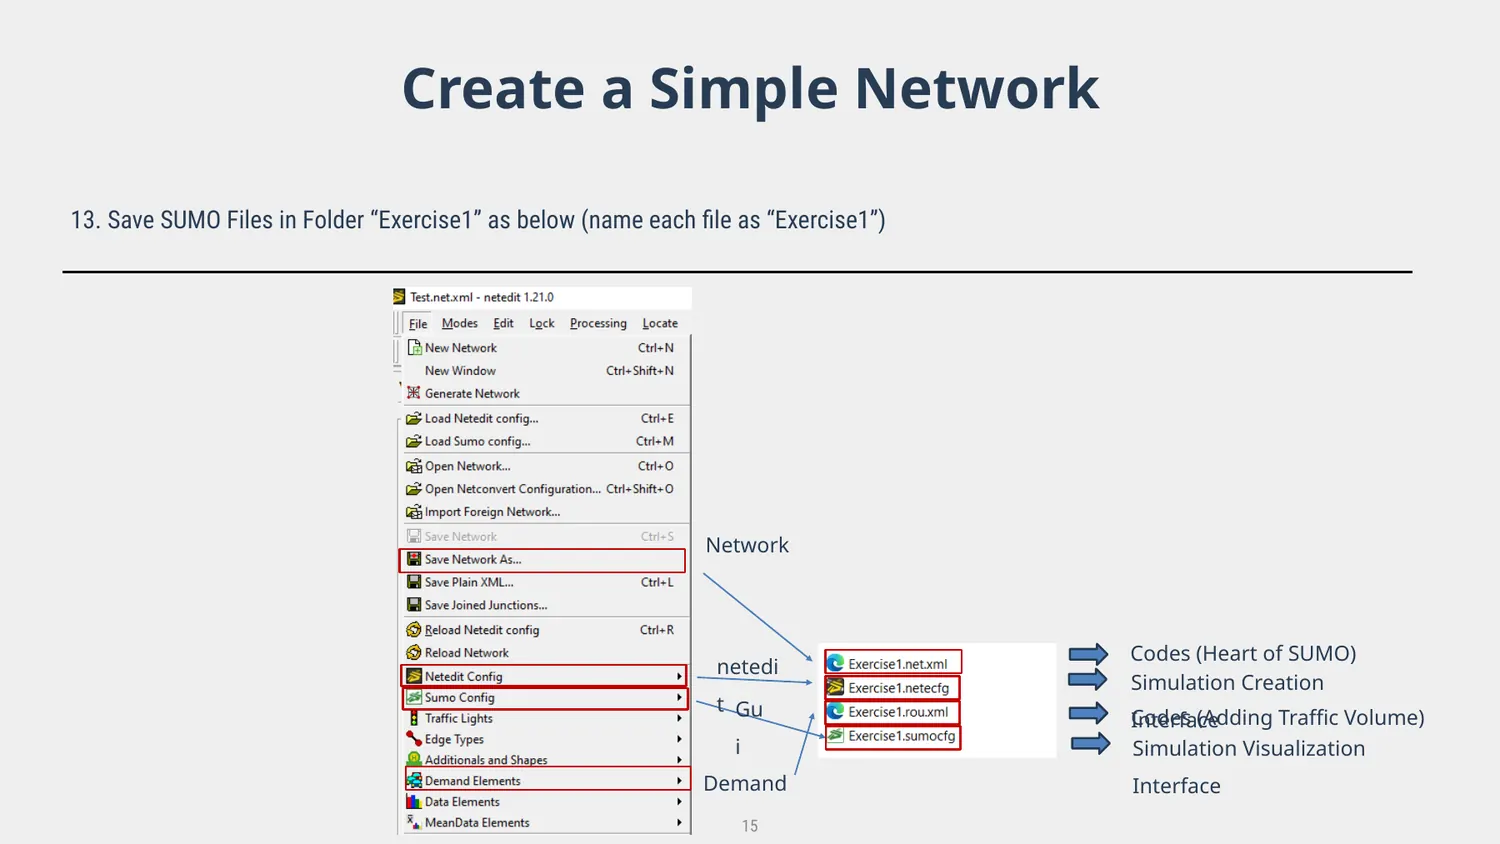
Save the files in your Exercise1 folder using the name Exercise1. NetEdit creates the network/demand/configuration files required for the simulation.
The main files created in the beginner workflow.
4
Run your simulation
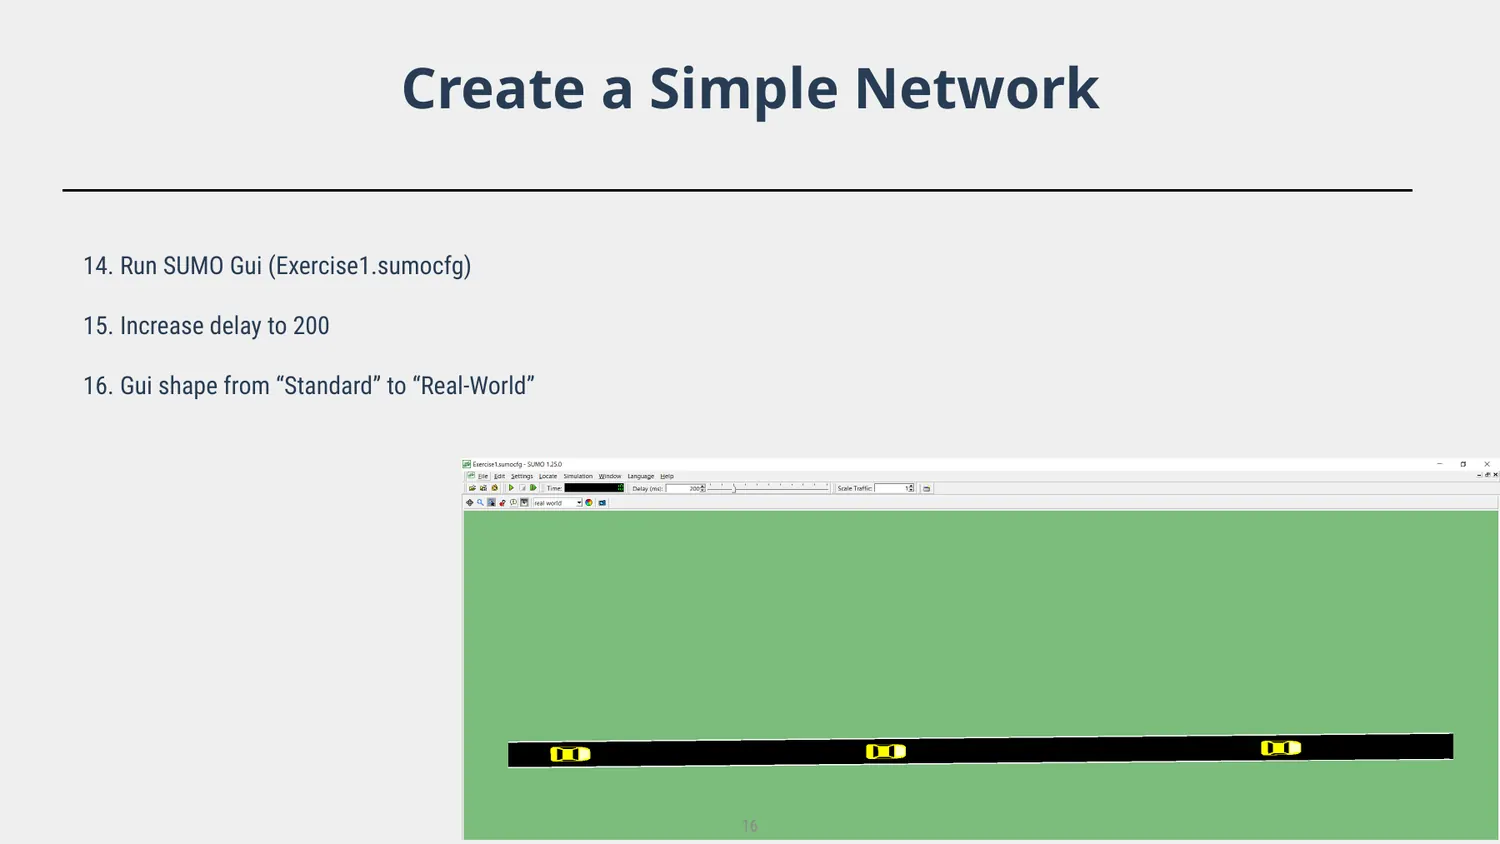
Open Exercise1.sumocfg in SUMO-GUI, set the delay to about 200, change the GUI shape to Real-World, and press Play.
Your first simple network running in SUMO-GUI.Step 6
Add the opposite traffic direction
1
Add the reverse edge
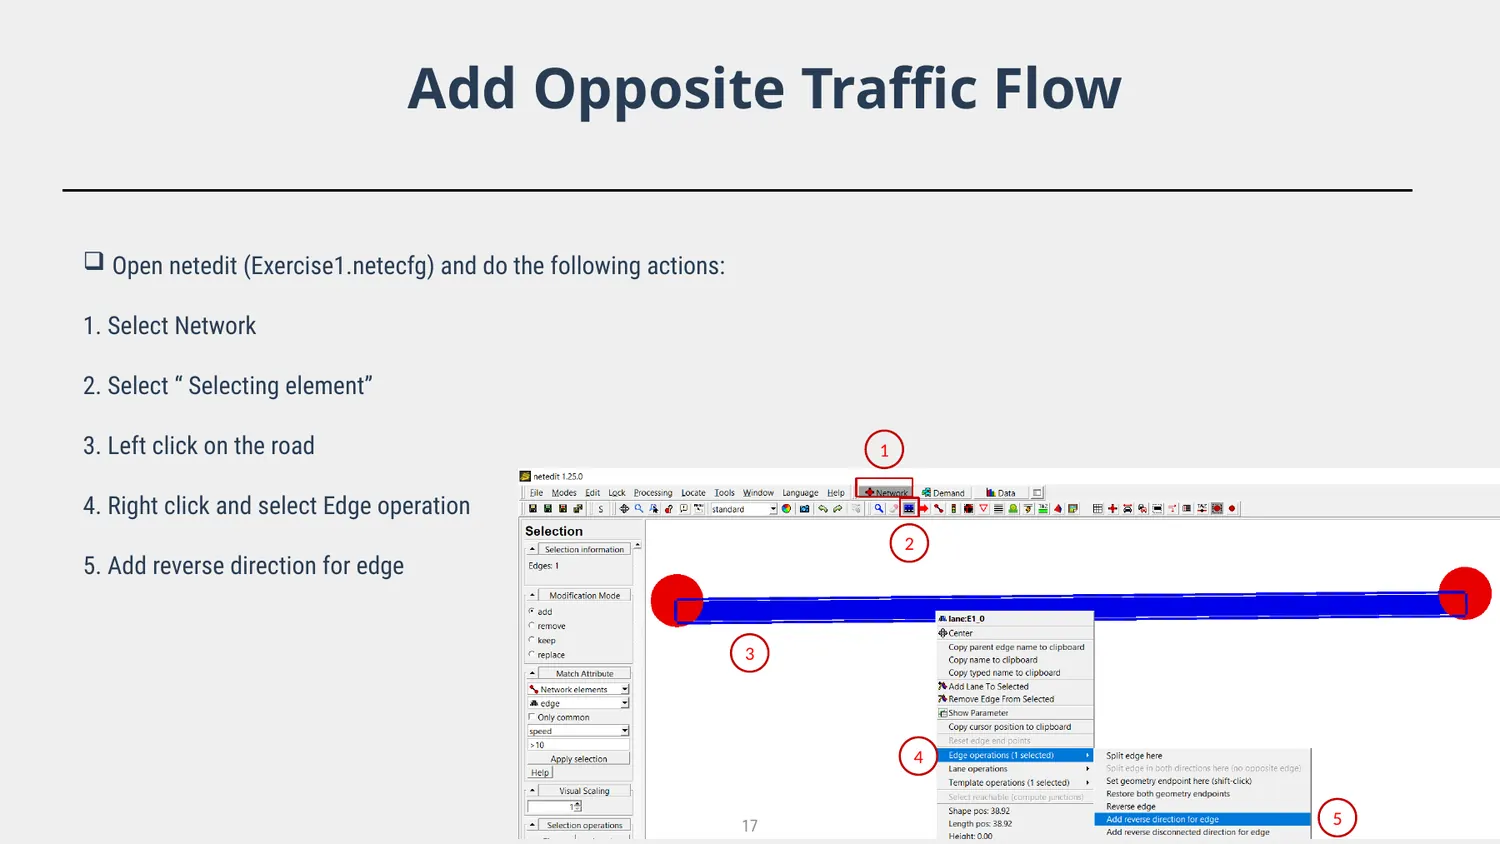
Open Exercise1.netecfg. Select Network → Select element, click the road, right-click, choose Edge operation, and add the reverse direction.
Add the reverse direction using Edge operations.
2
Add demand to the reverse direction
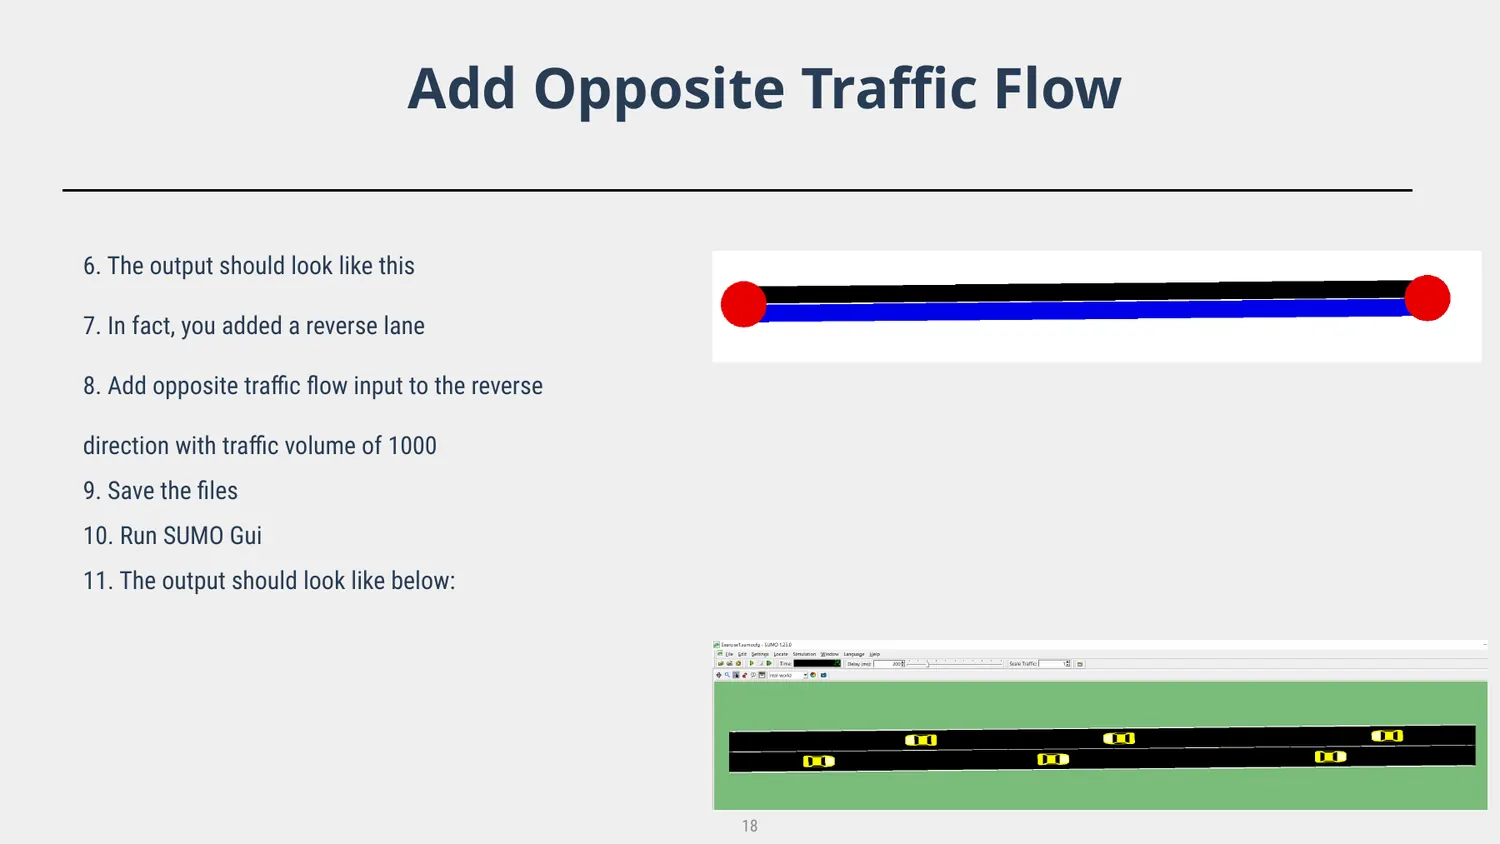
Add another traffic flow to the reverse edge with a volume of 1000 vehicles per hour, save, and run SUMO-GUI again.
The network after adding the reverse direction and traffic flow.Core concepts
Understand edges and junctions
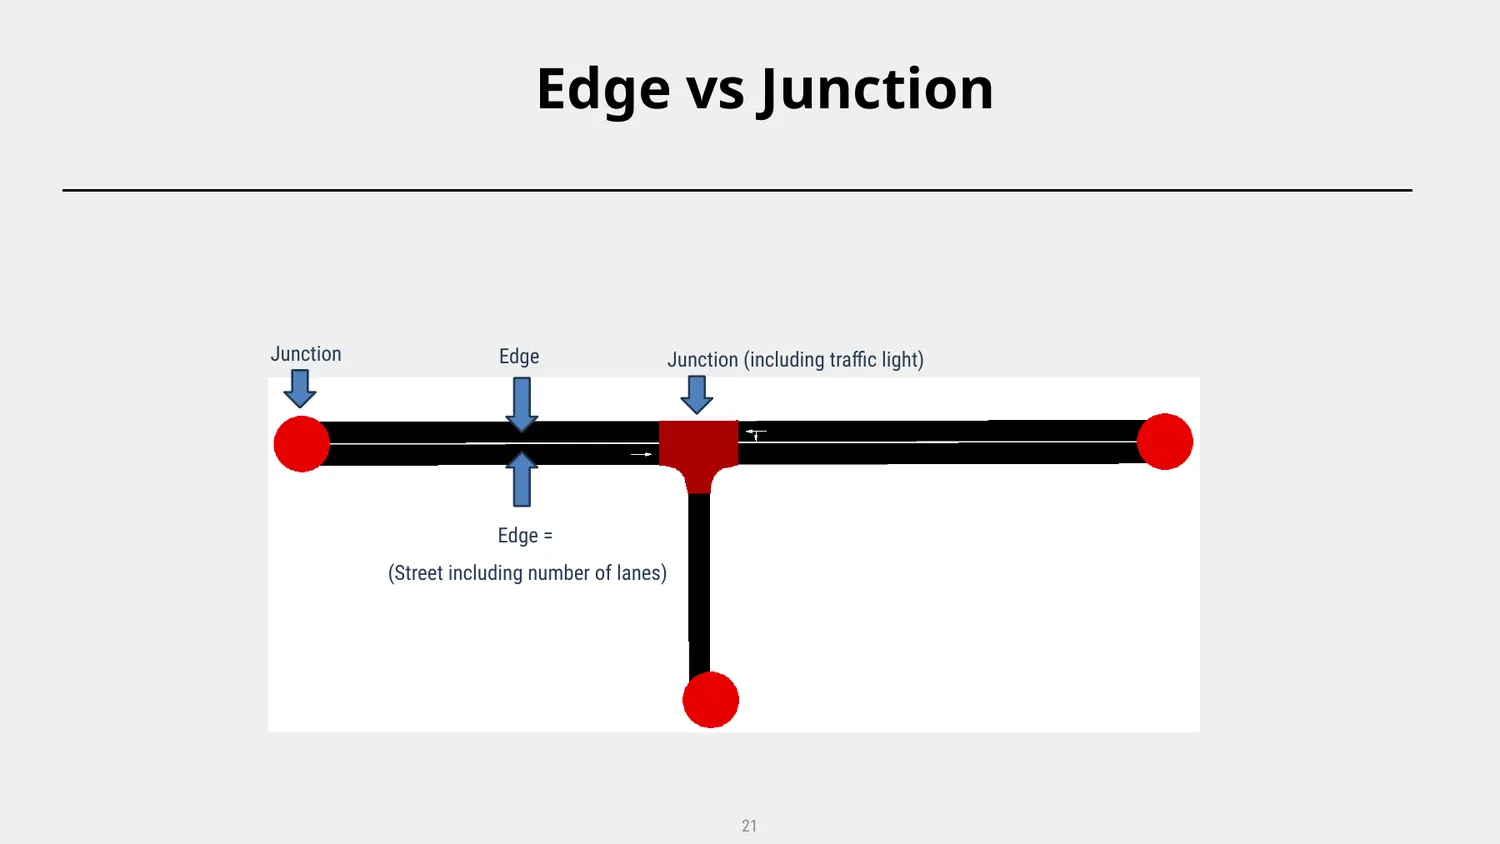
Edge
A street segment, including its number of lanes.
Junction
A connection point between edges. A junction may also include traffic-control logic such as a traffic signal.
Edge versus junction in a simple SUMO network.
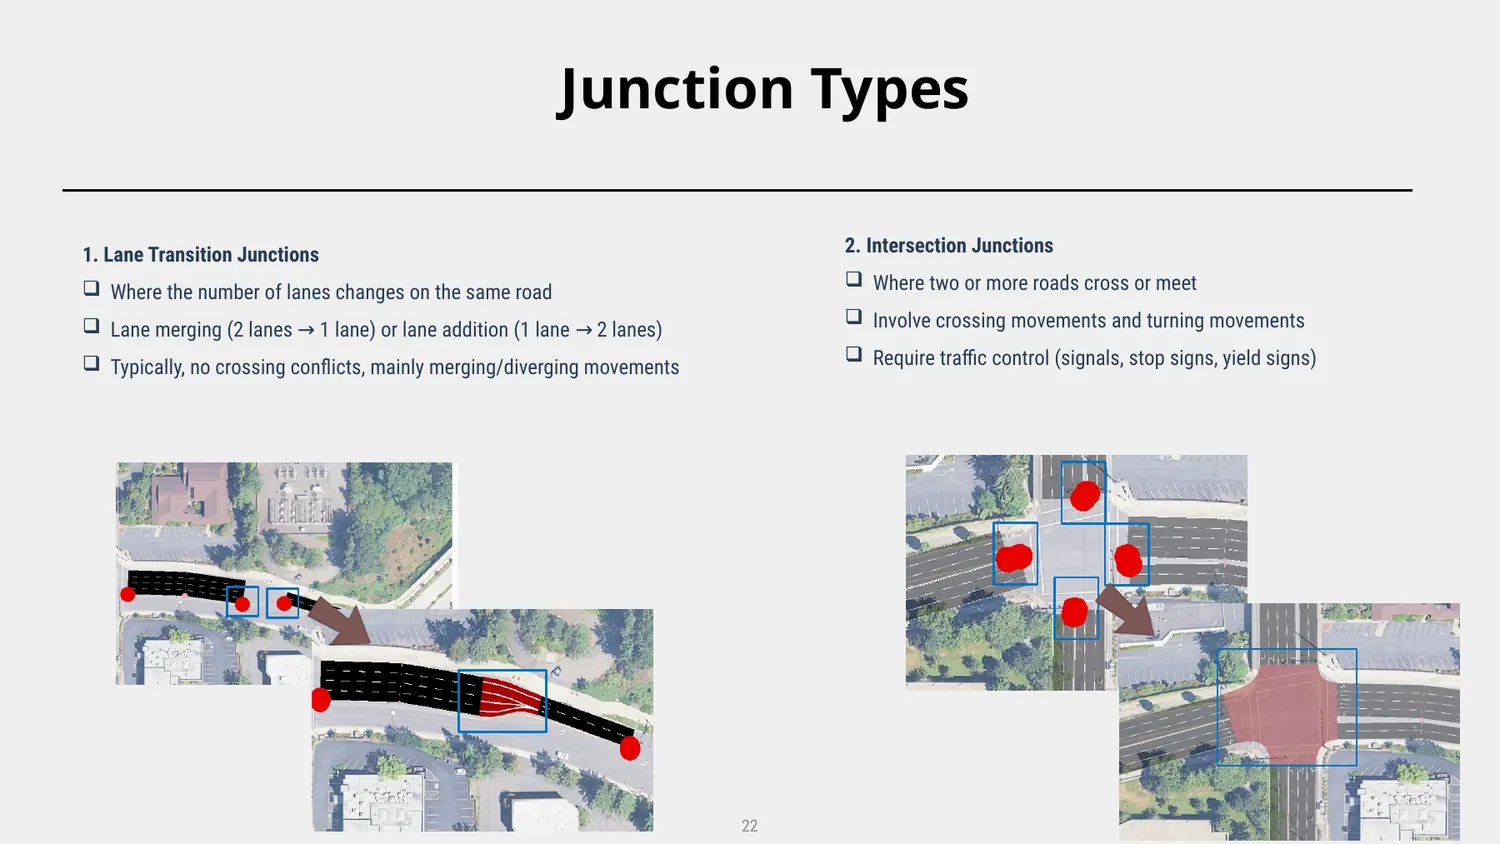
Two useful junction categories
Lane-transition junctions
Where lane counts change along the same road—for example, two lanes merging into one or one lane expanding to two.
Intersection junctions
Where roads cross or meet, creating crossing and turning movements that may require signals, stop control, or yield control.
Examples of the two junction categories used in the tutorial.Next step
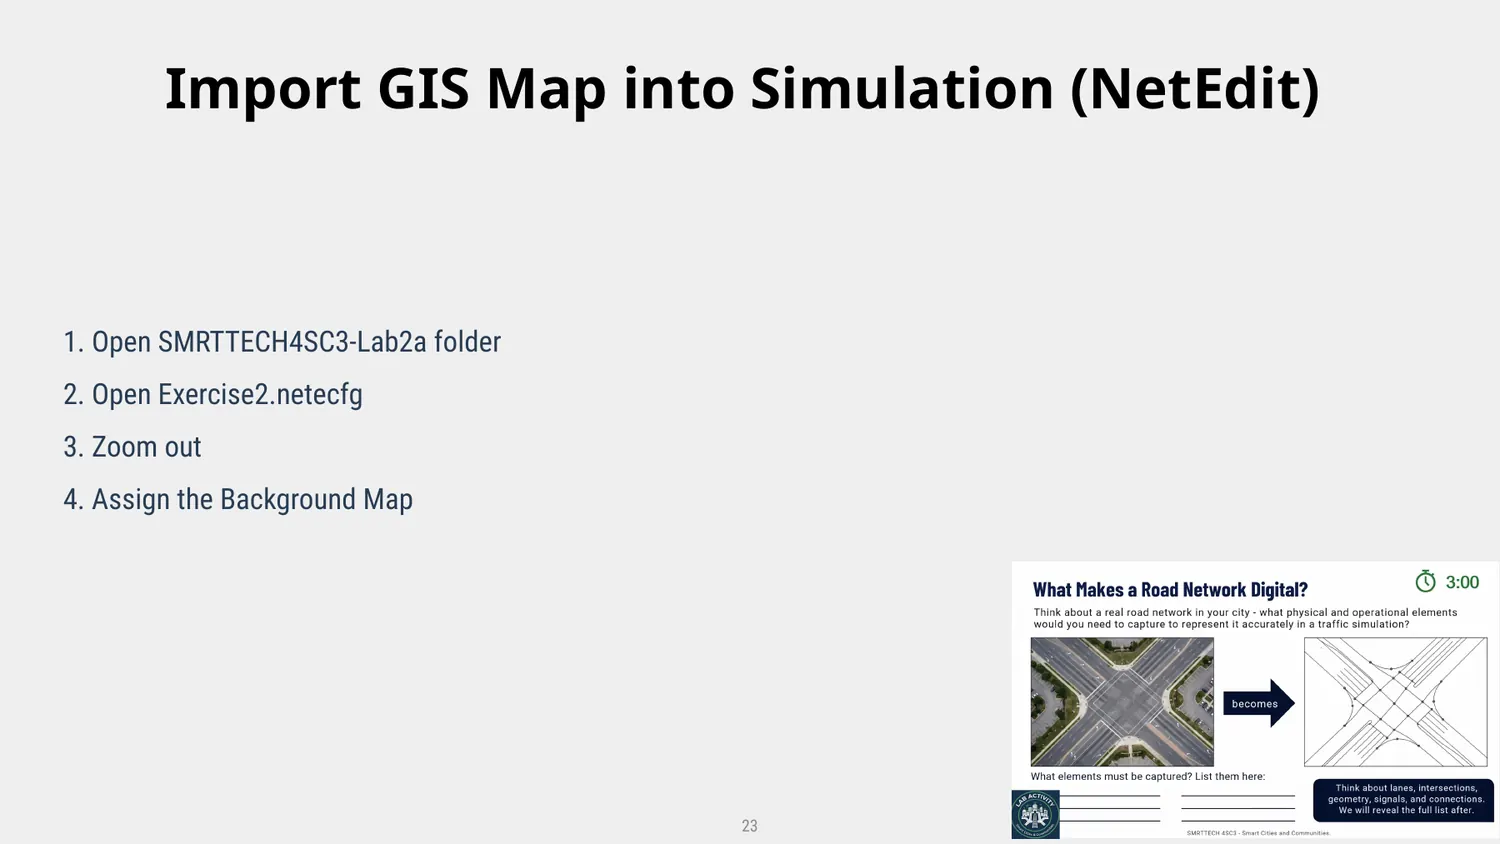
Assign a GIS/background map in NetEdit
The next exercise in the original lesson opens Exercise2.netecfg, zooms out, and assigns a background map to support network creation from real-world context.
Background-map workflow in NetEdit.Important
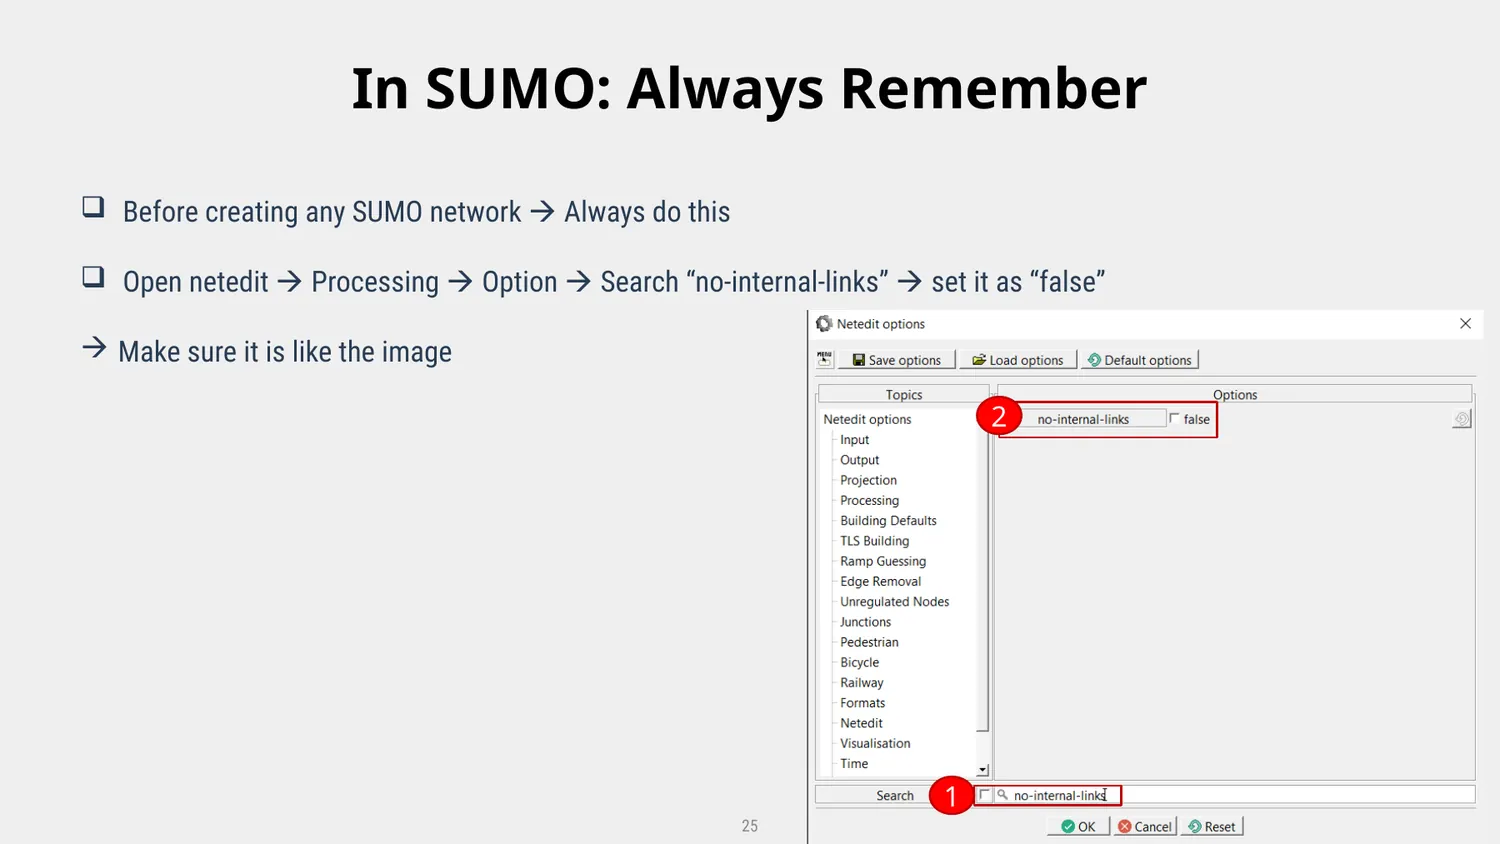
A setting to check before building a SUMO network
RoadwayVR tutorial setting: before creating the network, open NetEdit → Processing → Options, search for no-internal-links, and make sure it is set to false.
The no-internal-links setting shown in the original lesson.
Continue learning
Build from this first SUMO network.
RoadwayVR focuses on traffic simulation, SUMO workflows, Python/AI applications, and simulation visualization. Use this page as your installation reference, then continue with the video tutorials and sample files.